This Is More Than Just One Guide
11 courses and 18 free guides on AI automation for business — and beyond.
How to Create Your Own AI Avatar: A Digital Twin for Any Content
Shooting video every time is expensive, slow, and chained to a camera, lighting, and your schedule. An AI avatar fixes that for good: you set up your likeness once — six face references and one master prompt — then reuse it across any clip or generation. No reshoots. No drift. In 2026 this isn't an experiment anymore — it's a working tool.
What's Inside
Free · 6 min readEvery Shoot Starts From Scratch
A camera, lighting, takes, editing — for every single idea. A digital twin removes the production cycle and keeps your face consistent everywhere.
Reshoots eat your time
New idea — new camera, lighting, background, takes, editing. An hour of content costs you half a day. An AI avatar removes that cycle entirely.
Bound to place and schedule
Sick, traveling, no studio — and content stops. A digital twin works 24/7 and never depends on your calendar.
Generations drift
Without a locked-in likeness, every model draws a 'similar but different' person. Face, beard, hairstyle shift clip to clip — and your brand falls apart.
One Likeness — A Thousand Possibilities
Once your avatar exists, it becomes a production engine. Here's what the same single likeness can do for you.
Every use below runs on the exact same character sheet — built once, reused forever.
Two Steps to a Consistent Avatar
The whole quality of your twin comes down to the references you feed in. Two reference packs — your face and your details — and the model locks onto you.
6 Face References + Clothing Style
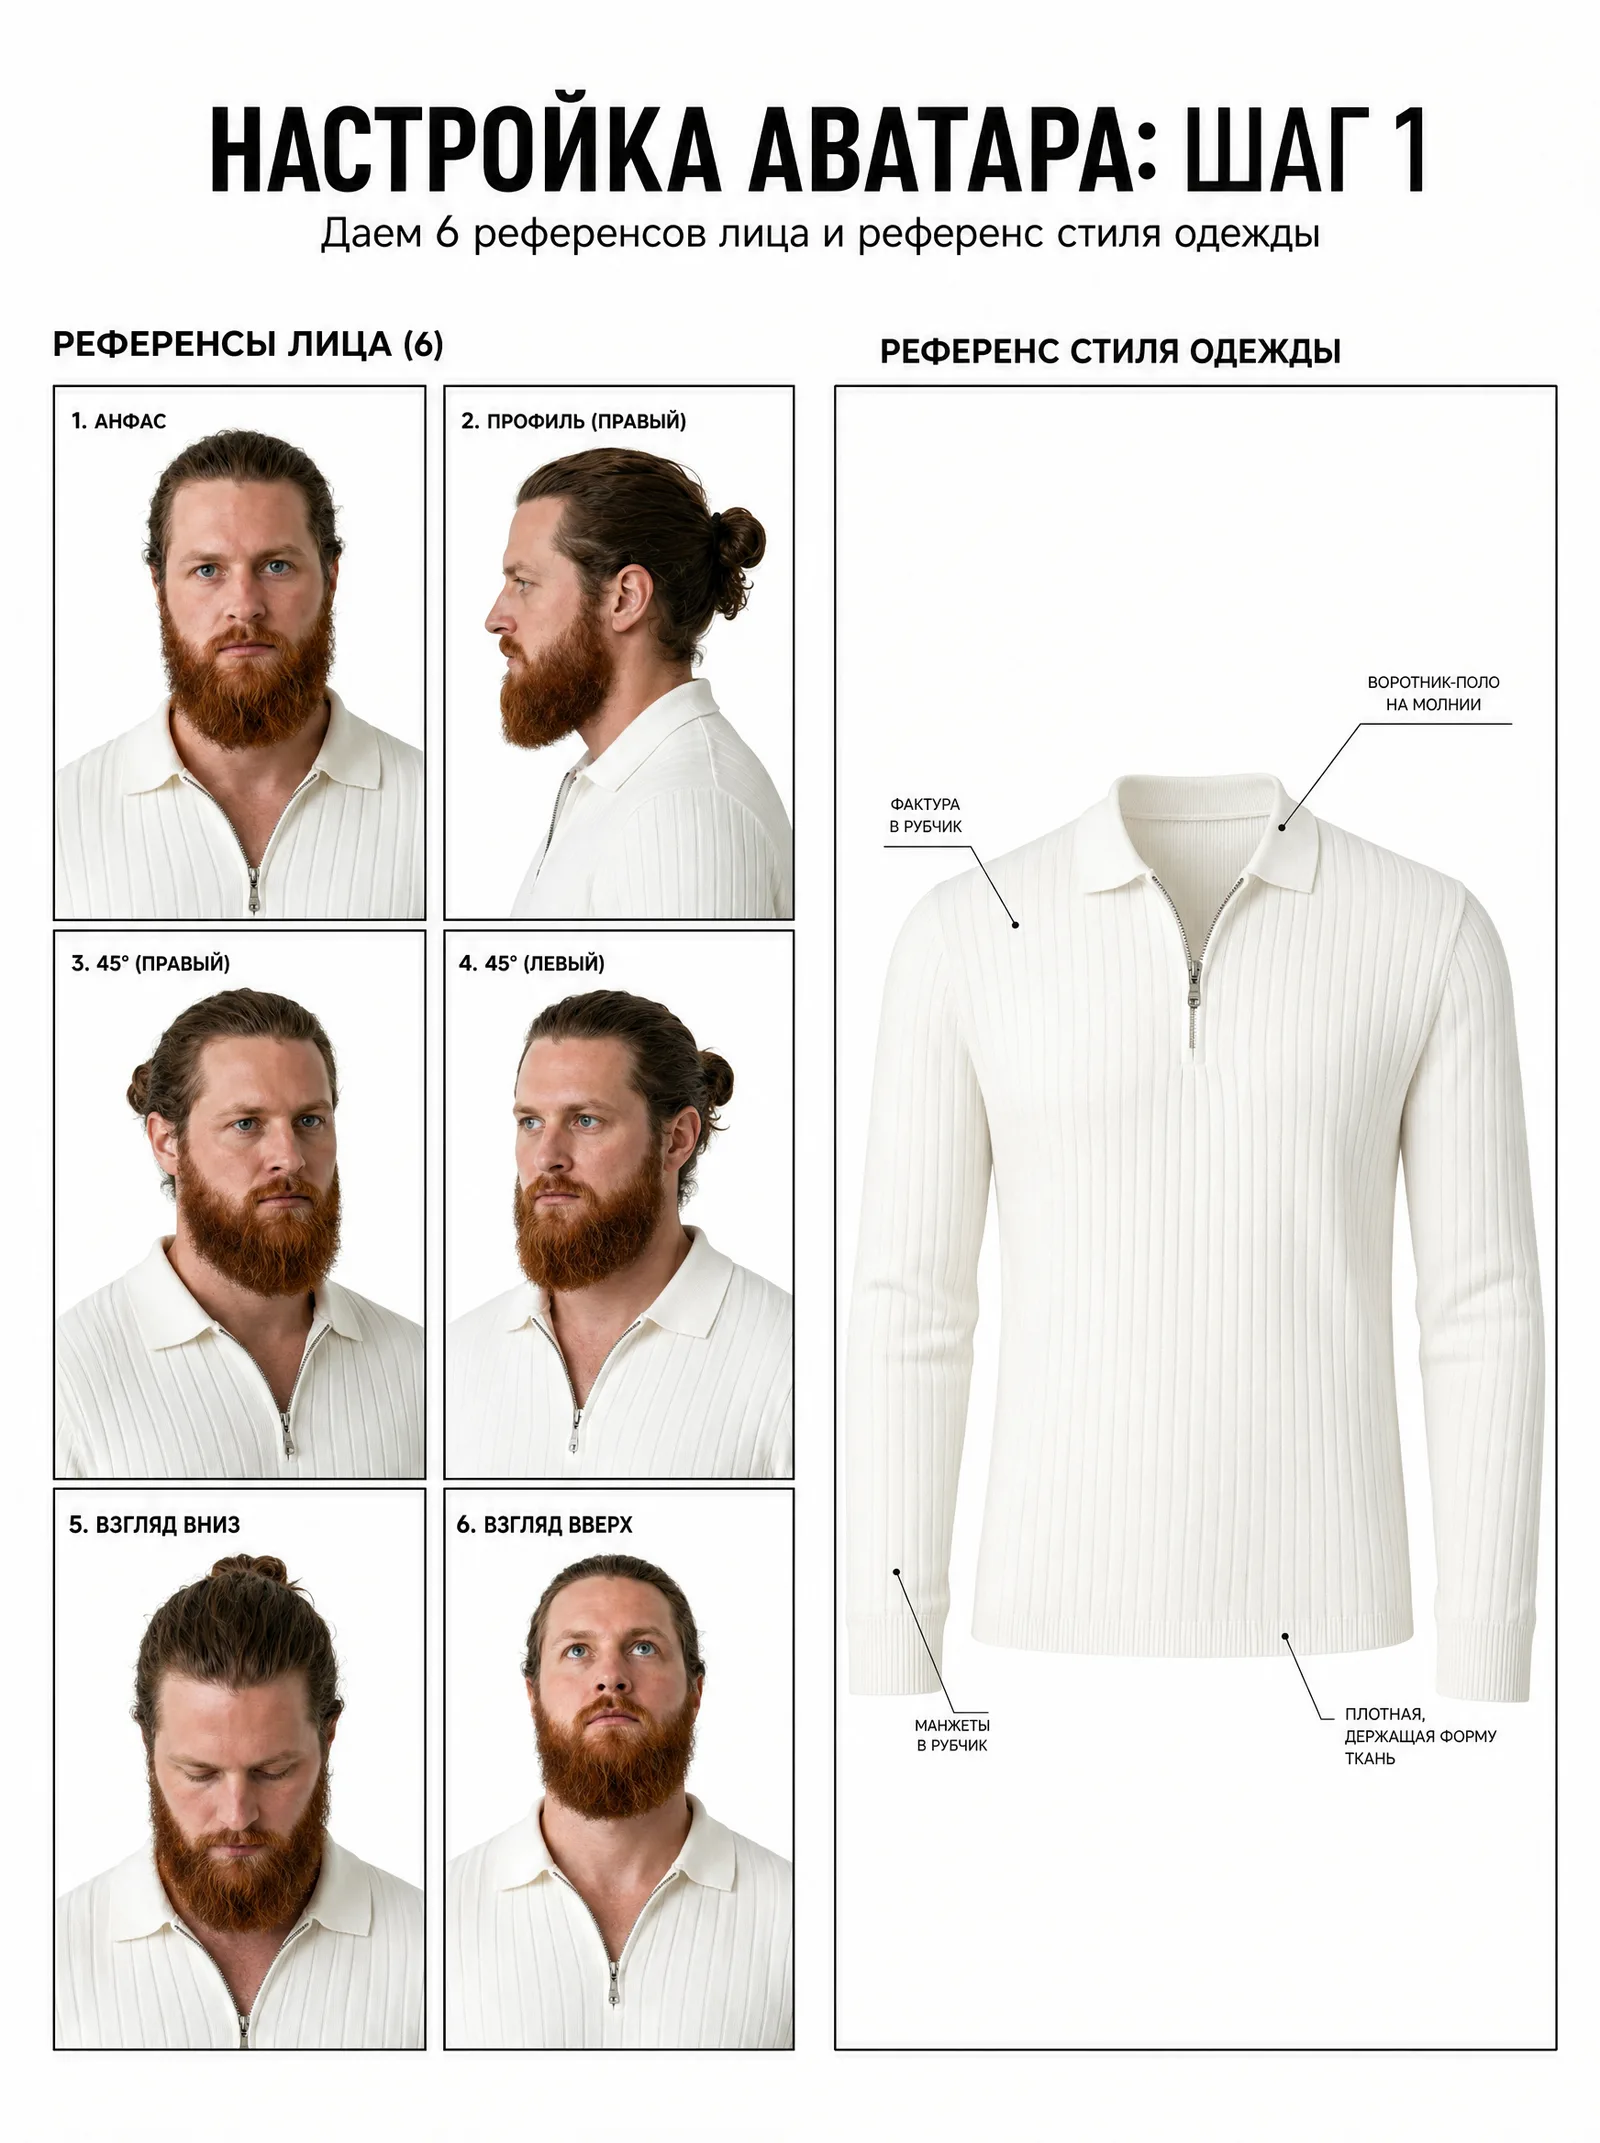
Upload six angles of your face: front, profile, 45° left and right, looking down, looking up. Separately — a clothing reference: fabric texture, cut, how the garment holds its shape. Together they form the 'passport' of your appearance.
What to include:
Front, profile, both 45° angles, looking down, looking up — plus one clean clothing shot.
Composition & Detail References
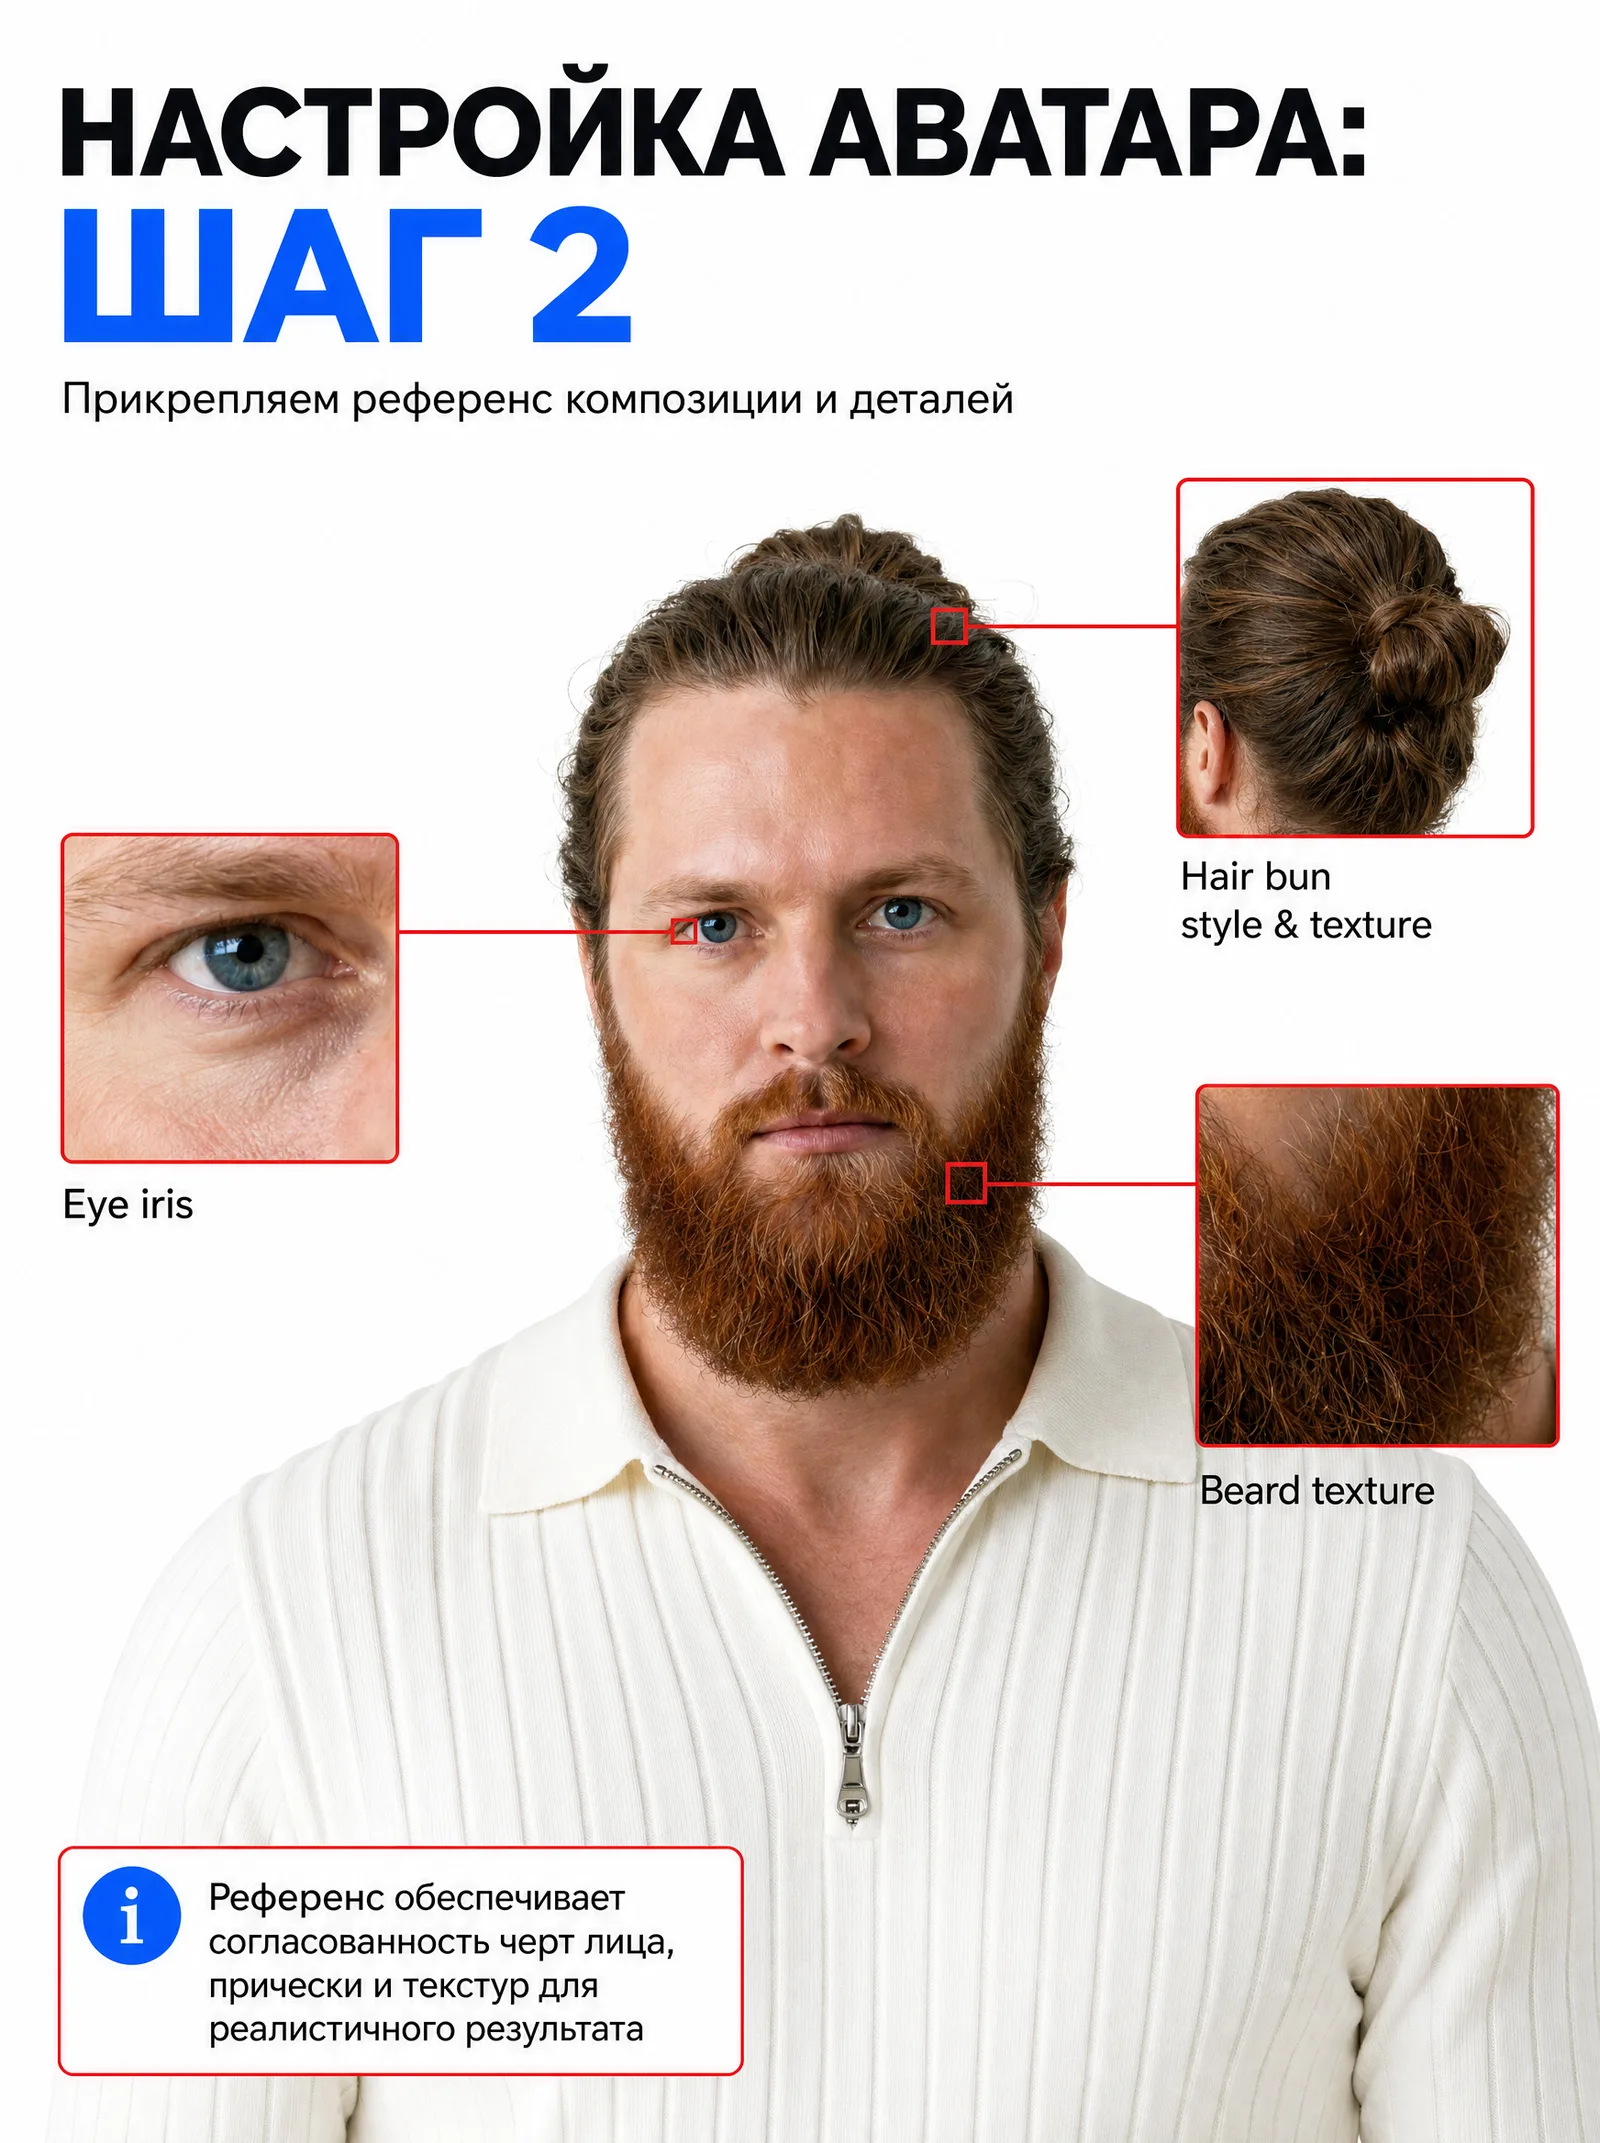
Attach close-up shots: hairstyle texture and style, the iris of your eyes, beard texture. These references keep facial features consistent — the result looks like you, not an 'average face from the internet'.
What to include:
Eye iris, beard texture, hair bun style — macro close-ups for maximum fidelity.
This Is the Prompt You Paste
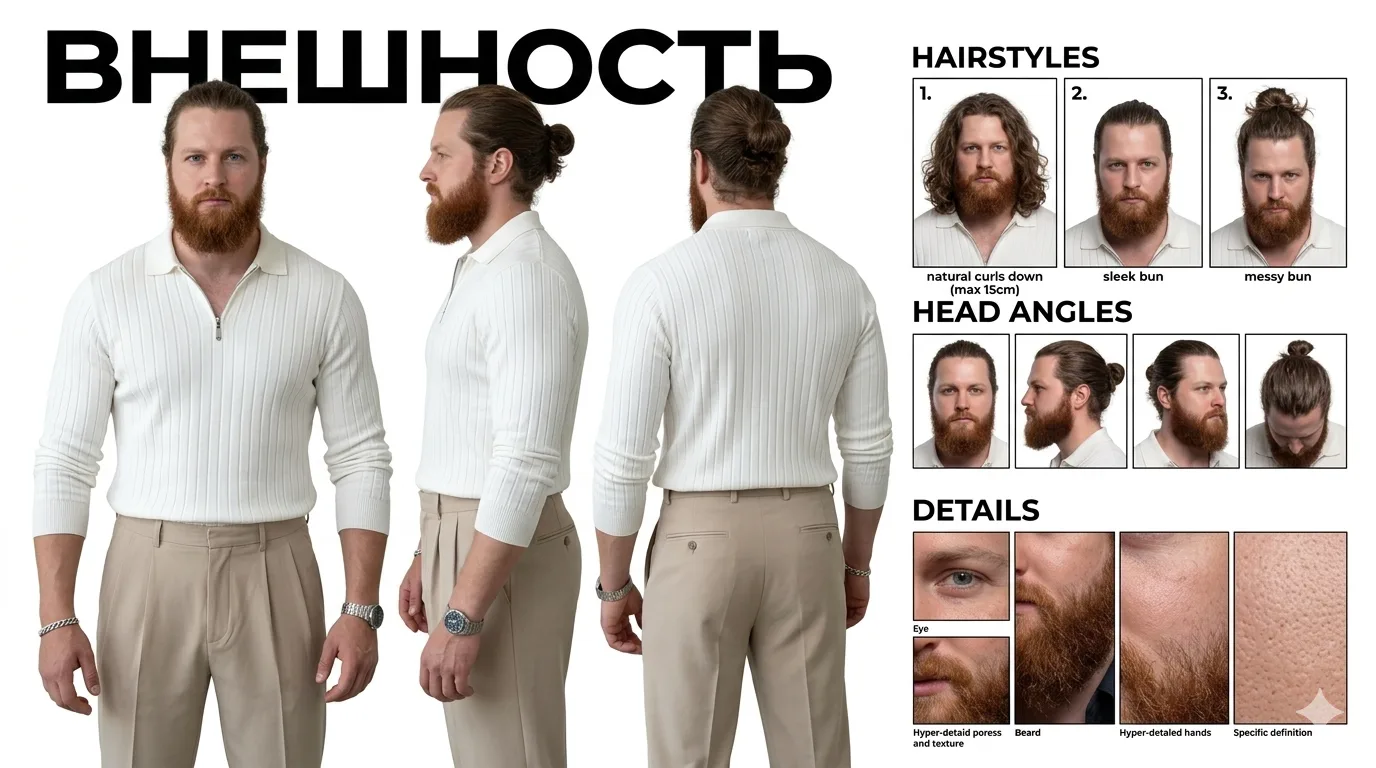
Copy it as-is. It builds a clean, structured character reference sheet — hairstyles, head angles, clothing, and macro details — all on one image.
A professional high-fidelity character reference sheet layout of a single subject, set against a solid plain white studio background. The layout and typography style must be clean, minimal, and perfectly structured as a technical infographic grid.

Typography & Labels:
- Main header "ВНЕШНОСТЬ" written in large, bold, black sans-serif font at the top-left.
- Sub-headers "HAIRSTYLES", "HEAD ANGLES", "CLOTHING REFERENCE & ID MAP", and "DETAILS" placed precisely above their respective sections in a clean, black sans-serif font.

Layout Sections (Grid Elements):
1. Main Views (Left): Full-body front, side, and back views of the subject standing naturally.
2. HAIRSTYLES Grid (Top-Right): Six numbered square frames demonstrating specific hairstyle variations. Frame 1: Natural curly/wavy hair down (strictly limited to 12-15 cm, dropping max to mustache level). Frame 2: Sleek tidy man-bun. Frame 3: Compact braided top-knot. Frame 4: Tidy short-textured man-bun. Frame 6: Half-up/half-down style.
3. HEAD ANGLES Grid (Middle-Right): Four close-up passport-style headshots showing the subject from different exact rotations (front, profile, three-quarter, looking down).
4. CLOTHING REFERENCE (Bottom-Center): A dedicated section with a "CLOTHING ID" square panel showing the standalone garment template and an "ID MAP" color-coded body segmentation guide.
5. DETAILS Grid (Bottom-Right): Four macro-photography close-up panels showing ultra-detailed micro textures: Panel 1: Eye iris closeup. Panel 2: Detailed beard texture. Panel 3: Wristwatch detail with visible numbers. Panel 4: Hyper-detailed skin pores and texture.

Subject Customization & Input IDs:
- The face, facial structure, eye color, and beard across all panels and views must strictly and consistently duplicate the likeness of the subject provided in [User Face Reference Photos].
- The clothing across all full-body and headshot views must strictly duplicate the style, texture, and color from [User Clothing Reference Photo] (e.g., a cream-white ribbed knit quarter-zip polo shirt tucked into pleated beige dress trousers, a metallic wristwatch on the wrist).

Technical Quality:
Photorealistic, 8k resolution, extreme facial fidelity, razor-sharp textures, neutral color palette, soft and bright studio lighting, studio product photography aesthetic.
How to use this prompt
Upload 6 photos of yourself
Load six photos from different angles into a neural net (e.g. Midjourney v6, Higgsfield, or Stable Diffusion). These become [User Face Reference Photos].
Upload 1 clothing reference
Add one reference of the outfit you want to wear consistently. This becomes [User Clothing Reference Photo].
Paste the prompt and generate
Copy the prompt above, paste it into the input field, and run the generation. The output is a finished, clean character map.
The full course covers prompt tuning, fixing artifacts, and getting a perfectly consistent character on the first try.
Done — Here's What You Get
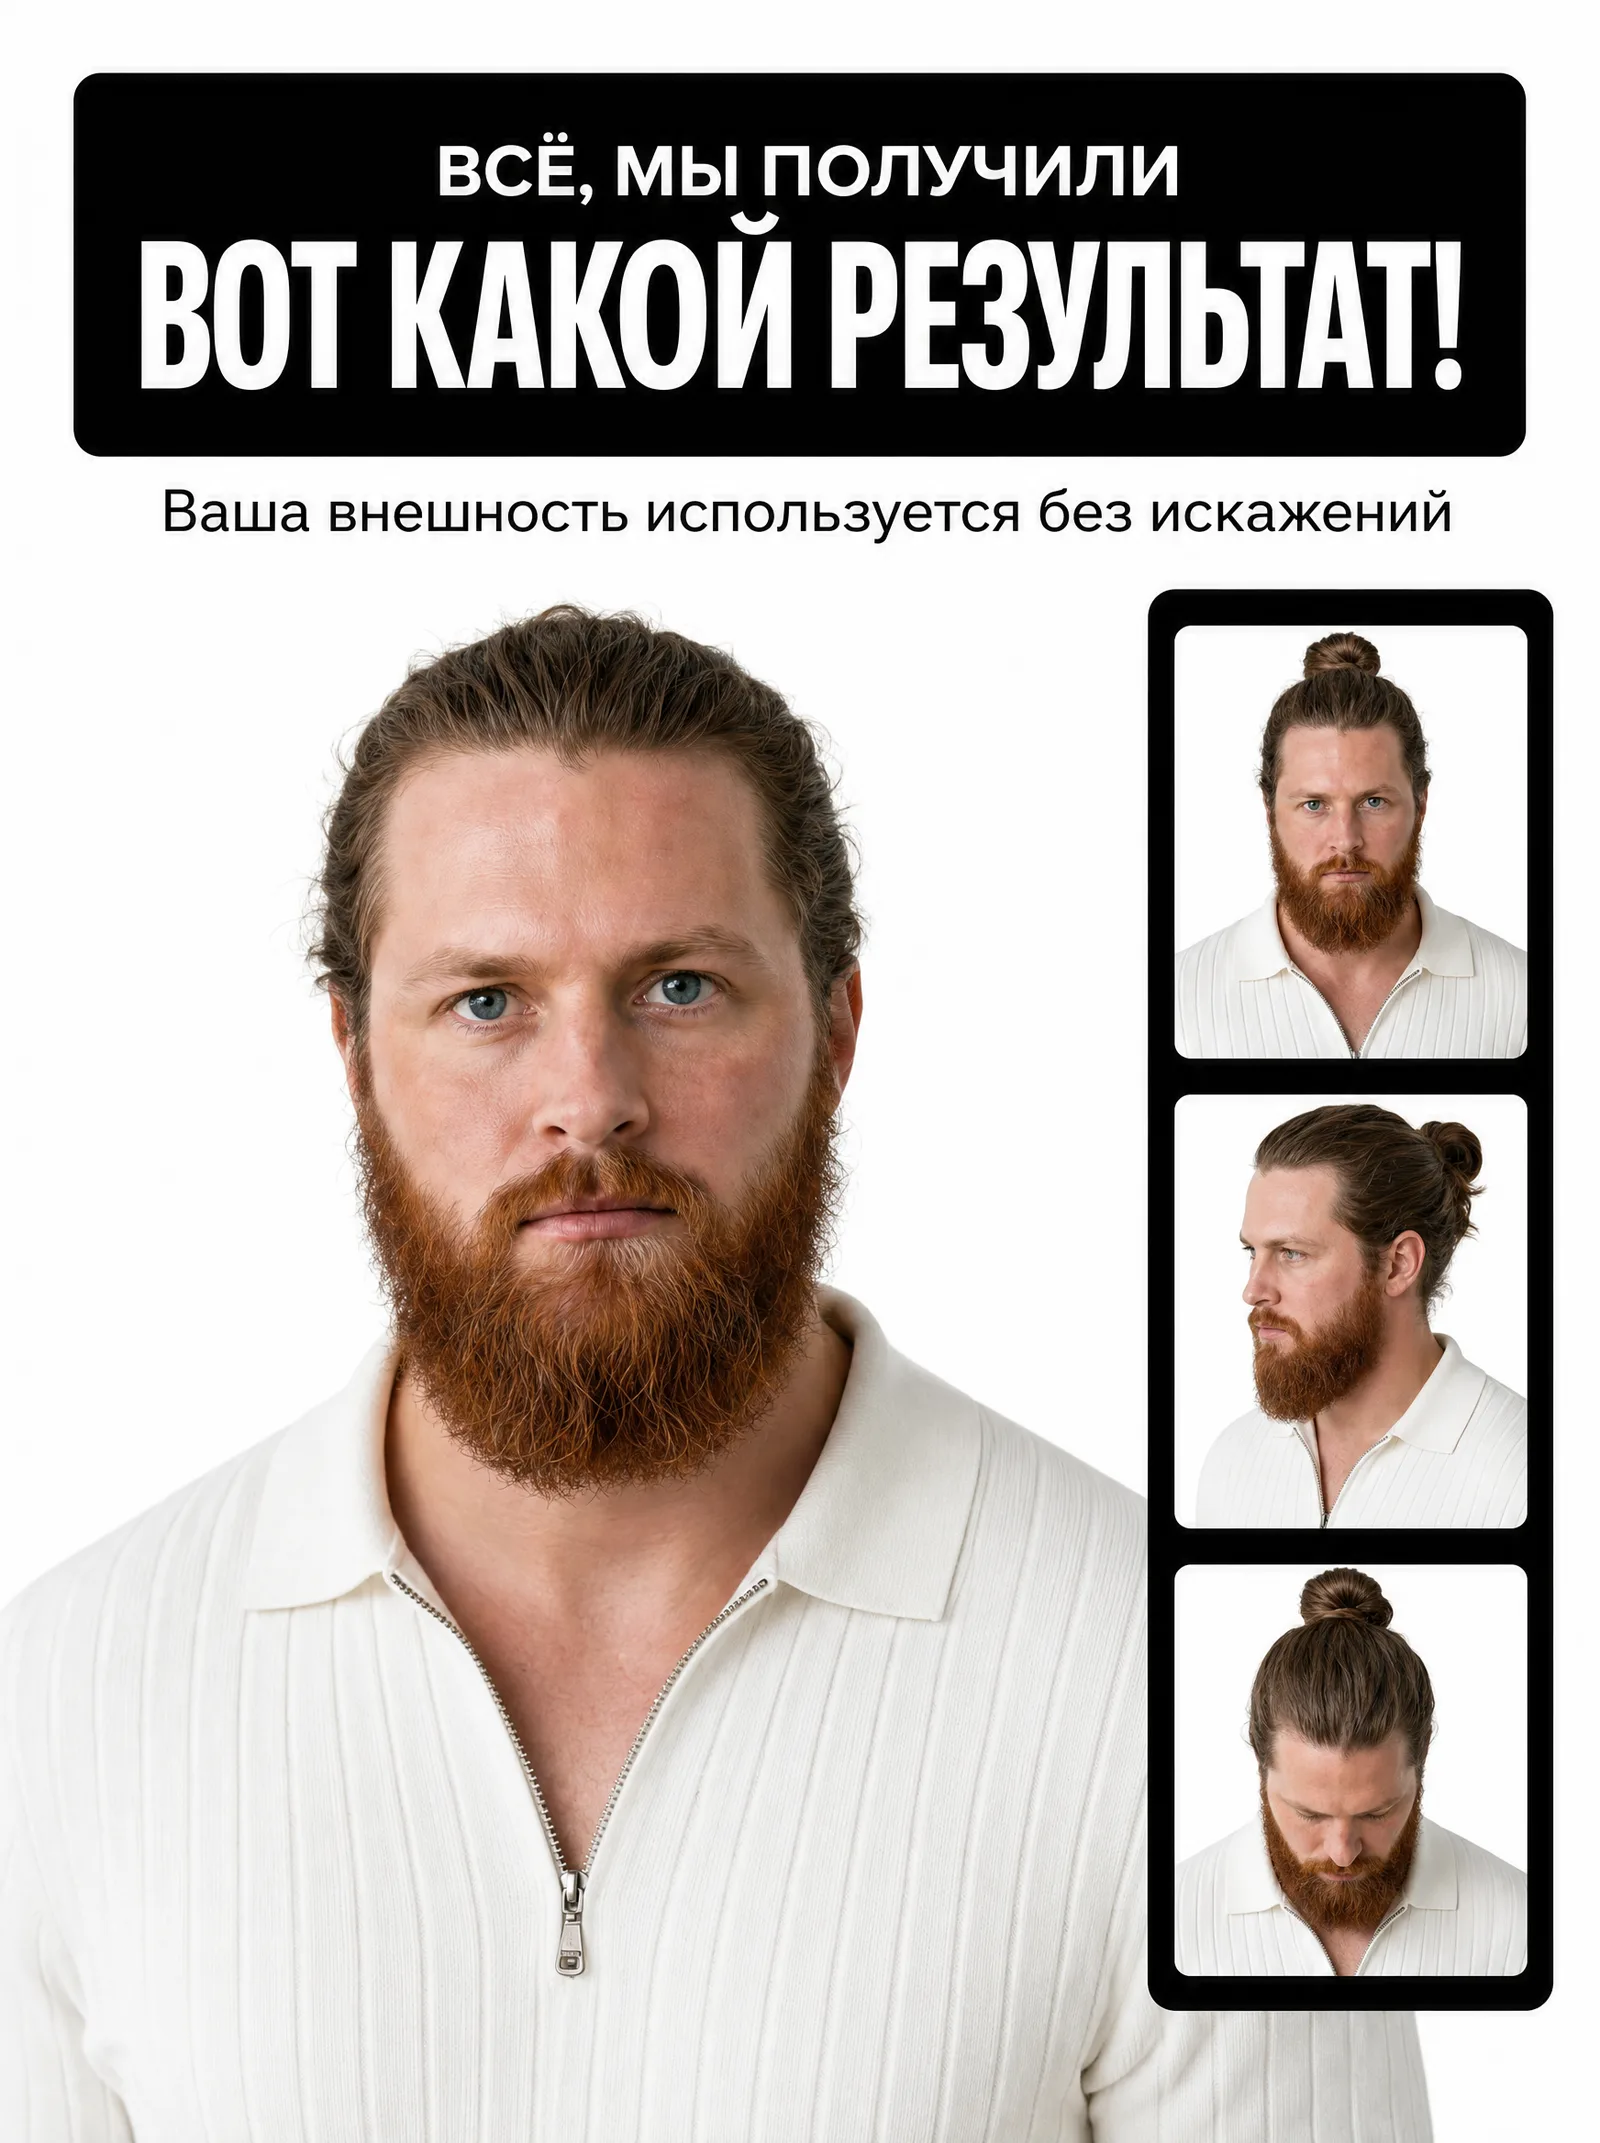
Your likeness, used without distortion.
The output is a single character reference sheet: your likeness across different hairstyles, head angles, and fully rendered details. This is your reusable digital twin — drop it as a reference into any generation, and the model returns you, not a lookalike.
From Photos to a Working Avatar in 6 Steps
A taste of what the full course teaches — the shape of the work, without the full depth.
01.Collect 6 face photos
Shoot six angles of your face: front, profile, both 45°, looking down, looking up. Even lighting, neutral expression, no heavy filters.
The full course walks through each step in detail — with real examples, animating the avatar, voice and lip-sync.
What changes when it works
You stop scheduling shoots. A new video idea becomes a generation, not a production day. Your face stays identical across every clip, every platform, every language. One likeness, built once, working for you on repeat.
Your Learning Path
Three courses that compound. Master the AI tool, then video content, then scale into everything else.
Master Claude Code first
The foundation. Context, prompting, and AI workflow — the base every other skill builds on.
Open the Claude Code courseMove into AI video
Turn your avatar into motion: AI video with Remotion, scenes, and serial content production.
Open the Motion Video courseScale into everything
AI sales, team workflows, automation. All included in the lifetime bundle.
See all coursesOne payment — everything unlocks
All 11 courses are independent. Pay once ($44.90), get lifetime access to every course, guide, and future update.
Give Your Avatar a Voice and Motion
The guide gave you the map: references and the master prompt. The full bundle gives you the whole route — animating the avatar, voice and lip-sync, serial content, and monetizing a personal brand. Lifetime access, every future course included.